How to Make a Tiny Craft-Fair Display at Home
A tiny craft-fair display turns handmade markets into a hands-on experiment, helping you see which arrangement makes your objects easiest to notice.
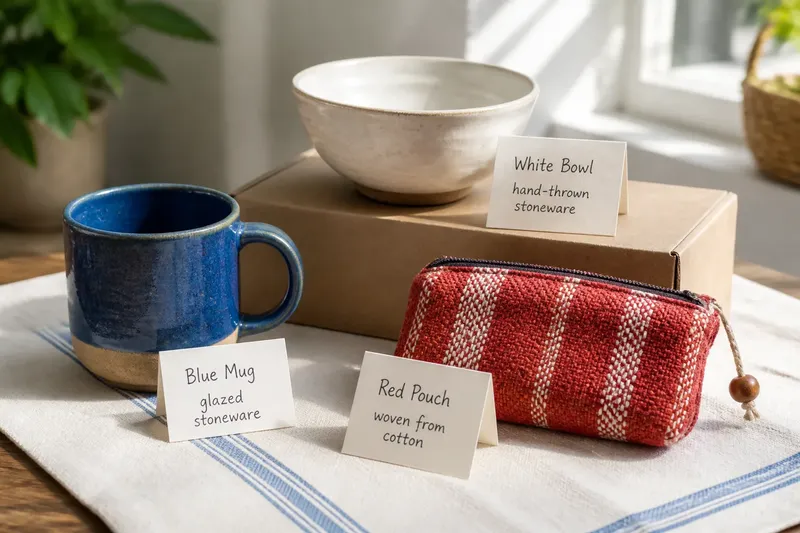
A cardboard box, a tea towel and three handmade objects are enough to test a tiny craft-fair display at home. This small making exercise recreates the choices a stallholder faces—what to group, what to raise and what to explain—without requiring a real market or a history lesson.
What do you need for a tiny craft-fair display?
Choose three objects with a visible difference: perhaps a mug, a small bowl and a folded fabric pouch. Add a clean cloth, a shallow box or sturdy book for a low platform, three scraps of card, a pen and your phone camera. Use objects that can sit safely on your chosen surface.
- Check that the display surface is stable; if it wobbles, move it to a firm table before arranging anything.
- Check whether each object is clean and free of loose parts; if not, clean it or leave it out of the display.
- Check whether the box or book supports the object without tipping; if it does, use it as a platform, and if it does not, lay it flat or choose another support.
- Check whether the cards are large enough to read from where you plan to stand; if not, rewrite them in larger letters or move them closer.
- Check whether the phone camera can capture the whole arrangement; if not, clear nearby clutter or shift the display to a brighter spot.
- Check whether the cloth slips when touched; if it does, smooth or secure it, and if it stays put, leave it as arranged.
Write one card with each object’s name, one with a material or making detail, and one with a care or use note. Keep the wording plain: “hand-thrown stoneware”, “woven from cotton”, or “wipe with a damp cloth” are easier to scan than a paragraph.
How should you arrange the objects?
Start with all three objects at the same height, spaced so each has a clear outline. Put the largest or most colourful piece near the back, then place smaller work in front without hiding it. Set the cards beside the objects they describe, not in a separate row.
Now make one change at a time. Lift one object onto the box, turn the mug so its handle faces the viewer, or move the pouch to the front. Photograph each version from the same standing position. The images make it easier to notice whether a change has opened up the display or merely shifted the clutter.
Say you have a blue mug, a white bowl and a red pouch, plus a shallow box and three cards. First, you arrange the objects in a straight line; in the phone image, the cards overlap the bowl. Next, you raise the bowl on the box and move its card beside it; the bowl’s rim is now visible, but the pouch sits partly behind the mug. Finally, you move the pouch to the front corner and turn the mug handle outwards. In the last image, all three objects and their cards can be seen. The result is a clear choice: keep the raised bowl and front-corner pouch, and leave the mug turned towards the viewer.
What should you check before settling on a layout?
Can you see every object at a glance?
Stand where a visitor would stand and look for hidden edges, handles and labels. If an object disappears behind another, change the height or spacing; if all are visible, keep the arrangement and check it from a seated viewpoint too.
Can you match each card to its object?
Read the cards without leaning over the display. If a card could describe more than one item, move it beside the intended object or make the wording more specific; if the pairing is obvious, leave it in place.
Does the display invite a closer look?
Notice whether there is room to pick up or inspect an object without knocking another one. If the objects are crowded, remove one or widen the gaps; if there is a clear route for a hand, keep the spacing.
Does the layout still work from another angle?
Take a second photo from the side, then check whether a platform blocks a smaller object. If it does, lower the platform or move the object; if the view remains clear, the arrangement is ready for another round of tinkering.
How can you test the display without overthinking it?
Invite someone to look for a few moments without explaining the arrangement. Ask them which object they noticed first and whether any card was hard to connect to its object. Treat the answers as observations about this setup, not a verdict on the objects themselves.
If nobody is available, cover the cards and try to match them to the objects after looking away briefly. A mismatch suggests the wording or placement needs work. You can also use the phone image as a pause button: zoom out, then check whether the whole display reads as a group rather than a jumble.
Keep a small note of each change and what became easier to see. “Raised bowl: rim visible” is more useful than “better”. If a change makes one object clearer but hides another, keep the note and try a different arrangement rather than forcing a single perfect layout.
What can a home display teach you about handmade markets?
A tiny craft-fair display cannot recreate the noise, movement or conversations of a public event. It can, however, help you notice how height, spacing, labels and sightlines affect the way objects appear together. That is a useful hands-on route into thinking about handmade markets: build a small scene, make one adjustment, and observe what changes.
For another round, swap in a different set of objects or use a sheet of paper as a pretend table boundary. Keep the same viewing position, then compare the new arrangement with your earlier photos. The simple craft-fair display gives you a way to explore presentation through making, with each choice visible on the table.